Notes
EVOLUTION OF MY GREENHOUSE
|
Contents Introduction The Four Versions
|
 |
 |
INTRODUCTION
When my family and I finally settled down in our own house, on my 1968 retirement from the Royal Canadian Navy, one of the hobbies I most wanted to improve upon was gardening. At last we could have a garden that would not have to be moved somewhere else on the continent every few years.
Our house was built in 1954 on what had been a vegetable garden, and there were 500 square metres of good topsoil which provided an excellent start for the landscaping, a long process which was to last for several years. THE FOUR VERSIONS
1. COLDFRAMES
During each year that we lived here, the gardens increased in size, and very soon after we moved in finally, I installed a good-sized set of cold frames. These proved to be rather difficult to manage, so I built a set of simple trusses which, each March, I would set up against the house and cover with 4-mil thick polyethylene plastic to make a sort of hybrid coldframe/greenhouse affair, big enough to stand up in, and with room enough for a couple of 10-foot tables inside. In this unit I could harden off the plants I had started indoors under lights, and it worked very well. Each June I took it down and stowed the trusses away. Its cost was about $7 annually for plastic. Nowadays (2002) this would be rather more.
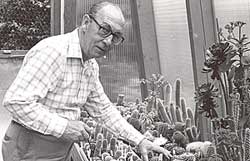
Then, about 1971, out of curiosity, I started to cultivate cacti and other succulents in a serious way, and not long after that I joined the Cactus and Succulents Information Exchange, very soon to become irretrievably hooked on growing these fascinating plants. Before very long, the need for a full-fledged greenhouse to accommodate my ever-growing collection became undeniable and I started searching for ways and means of providing one that I could afford.
2. THE FIBREGLASS LEAN-TO
I finally settled upon a simple lean-to design, using trusses made of 2"X3" hemlock, which I covered with corrugated fibreglass (Filon) panels, and I lined it with 4-mil polyethylene plastic sheeting. This structure was 2.4m (8-ft) wide, 4.2m (14-ft) long, and about 2m (6-ft) high inside. Within a couple of years, it became quite well filled with cacti and other succulents.
 By this time, about 1973, the vegetable and flower seedlings had their own basement area and their own cold frame, so the little greenhouse was fitted out with a salvaged electric baseboard heater and a thermostat adjusted to a setting just sufficient to ensure that the temperature would never drop below about 4C (40F). This provided very nicely for the cacti and other succulents' dormancy requirements in Winter at a fairly reasonable cost for electricity. I learned, however, that heating costs would have been quite a substantial amount less had I bedded the fibreglass panels in thin foam plastic to make the structure more carefully weather tight.
I had installed two benches containing coarse sand about 7cm (2.5") deep, and electric heating cables in each, but the cables proved to be more troublesome and costly to operate than valuable. For example, they interfered with proper off-season dormancy of the plants, tending to dry out the pots far too much and far too quickly. The sand, however, still provides a very useful heat sink, even when the cables are not operating, because it absorbs heat during the day, and releases it slowly at night. This tends to reduce heating costs while providing a much more gentle heat, and slower changes of temperature. I later used the cables only for supplementary heat when needed, or to provide bottom heat when germinating seeds.
 In a third bench, I experimented for a few years with a 7cm (2.5") deep layer of broken bottle glass (treated by tumbling to make it safe to handle) in a plastic-lined trough, filled with water to about 4cm (1.5") deep. This water heated up by radiation through the glass, especially when the sun shone directly upon it, and it released its heat later as the air cooled in the greenhouse. The pots sat on the glass, about 2cm (1") or so above the water. It was a useful temperature modifier and buffer, and a very attractive, interesting material in several colours and grades of particle size for various uses which I wrote about elsewhere. Eventually, however, this glass was found to be impossible to keep perfectly safe and its use was regretfully discontinued in all my gardening or greenhouse uses. I had considered partial melting, rather than tumbling, of the glass pieces to round out the sharp edges, but calculations proved this to be very costly and fatal to all ideas about economy.
 The Filon fibreglass, with its polyethylene liner inside the gh, acted together as a splendid diffuser of daylight for my photography of the plants and the flowers, suppressing harsh shadows and softening the highlights, but not distorting the colours, which I could capture precisely by this arrangement. Very nearly all of my plant photos were exposed in this area.
Interestingly, the 4-mil thick polyethylene lining remained in very good condition for 3 to 4 years, whereas the same material, applied to the outside of the structure, deteriorated seriously by the action of some component of sunlight, within 10 to 12 months, especially where the plastic touched the structure. Heavier, 6-mil plastic deteriorated just as quickly, outside, and also had to be replaced every year.
The filon fibreglass was guaranteed to last for 10 years, and it remained in very good condition throughout all of that time. In 1983, when it was 12 years old, all I had to do was to rejuvenate the slightly fuzzy and slightly yellow colour of the outer surface of the roof fibreglass by washing it, using a little detergent and fine steel wool and, when rinsed and dry, to give it one or two coats of the special lacquer available from the dealer. That gave it another 5 or more years of useful life, and the improvement in light transmission was quite appreciable, very much worth the effort and small expense. The wall fibreglass had not deteriorated appreciably except for slight yellowing, and that largely disappeared when I washed and varnished it. I should note, however, that this lacquer treatment should be applied every 3 to 5 years if it is desired to retain the best ultra-violet transmission capacity of the fibreglass and to prevent its erosion. In 2002, the fibreglass remains still in good condition although a bit thinner. That little greenhouse served me very well indeed for over fifteen years and the fibreglass may be easily scrubbed and given a coat of lacquer to make it useful for a good many more.
Comments on materials and methods
The 'Filon' corrugated fibreglass panels, each 26"X 96", of the older greenhouse, in 1971 or '72, cost 65 cents a square foot for the 10-year-guaranteed, "5-ounce" grade. Together with the special, gasketed aluminum nails and the special corrugated wood closure strips, it is available now in more varieties of size, colour and grades.
The lacquer to resurface the filon fibreglass, "Excelac Clear Panel Resurfacer" should be applied, ideally, every 3 years or so to preserve the ultra-violet transmission capacity of the fibreglass.
Each of the two ventilators in the old greenhouse was automatically actuated by a 'Humex Ventmaster' unit which I bought in 1972 for about $50 each. Still effective in operating a 12 pound ventilator after 13 years of continuous use, each unit is a sealed hydraulic cylinder filled with a thermally expanding material, and it costs nothing to operate. Others such as the "Eden Automatic Roof Ventilator", "Thermoforce Select" and the "Solarvent Automatic Greenhouse Vent" may be available. Check with your local supplier.
Despite what I said about heating cables in another part of this article, they are still quite useful in a good many ways, especially when bottom heat is needed for seed germination. Several different kinds are available enough now. One just selects the cable, priced according to length, and the thermostatic control which will do the particular job required. I have also used successfully a "Roof Defroster Cable" which works very well with a "Greenstart Thermostatic Control" which can handle a couple of 60-foot cables very nicely.
3. A LEAN-TO FROM "FREE" STORM WINDOWS
By 1985, however,the Filon greenhouse was too small by quite a lot. The plants had grown both in size and in variety, and I needed more room to accommodate them properly. As well, I wanted to grow still more genera and species because I had photographed most of the 300-odd species I had. In 1985, therefore, I started the very interesting project of designing and building a new greenhouse. Because I am not very rich, I couldn't even think about buying a ready-made unit and, since another of my hobbies is carpentry, I planned to build it myself using a number of storm windows which a friend had discarded. The new greenhouse had to be a lean-to type, located in full view of the street, so it had to be designed as a good-looking conservatory, compatible in appearance with my house, and forming part of it.
Well, I managed to design a smart enough looking unit with the storm windows, but the structure was weak and complicated, the insulation value was very poor, and the maintenance afterward would have been extremely demanding. As well, I estimated that the cost would still be far too high, even though the windows cost nothing, because of the complicated structure, and the need to provide another insulating liner inside.
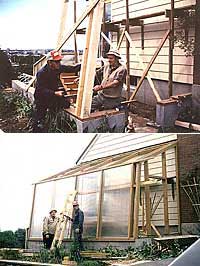
4. THE FINAL VERSION: THE ACRYLITE SDP LEAN-TO
 I had been impressed by the appearance of the double-skinned acrylic (perspex) material called ACRYLITE SDP, used in an alcove for a restaurant, and I made some inquiries about it. Armed with the extensive and detailed literature that was supplied by a Dartmouth agent, I redesigned the structure around this material in 1985. It was beautiful! The structure is strong, simple and minimal. The Acrylite provides its own insulation easily equivalent to glass thermopane units, it is light, strong and handsome. It transmits almost all of the sunlight (86%) and is very good at retaining the captured solar heat. It is virtually maintenance-free, and in seventeen years (2002), it has not become brittle or discoloured. It carries a limited 10-year warranty. It is made in Ontario and in New Jersey and is easily available in sheets 1.2m (actually 47.25") wide, and 2.4m (8-ft) to 4.9m (16-ft) long, or any special length by arrangement. It is 16mm (5/8") thick. Quite a bit less costly than glass and much more resistant to breakage. A sister product, called CYROLON SDP, is a polycarbonate, virtually unbreakable, and designed for greenhouses susceptible to hailstorms and vandalism. Cyrolon is quite a bit more expensive than Acrylite, however. In 1985 I paid $3.65 per square foot (plus tax) delivered, for Acrylite, while Cyrolon would have cost $5.60. Glass, double glazed, would be higher still. The best price I was able to find was $7.92 a square foot for greenhouse quality glass thermopane units, not counting the very considerable extra structure that would be needed. (Prices, in 2002 of course, are much higher.)
  |
 |
I decided not to use any of the aluminum glazing systems designed for this material, but to incorporate a glazing system of my own into the lumber for the framing. This lumber was milled to my specifications, and a very small setup charge by our local Barrett Lumber Co., who did a splendid job for me, and delivered within 24 hours, in fact. Special cap mouldings I made from 2 X 3 hemlock and spruce lumber (Diagram 1) to serve, together with the Tremco bedding tape, as the glazing system.
)
The design criteria
Having decided on the basic materials, I went on to analyze just what I wanted, and how much of it was practical. This is what I settled upon:
- Since the new gh would be built over the south picture window I decided to replace that with a set of patio doors ($680). I made a mistake, here, in allowing the door vendor to provide the installation service ($350). This 'service' cost $70 an hour, and the finish the workmen put on it in my dining room was equivalent to what you can see anytime in any provincial picnic park comfort station. I had to rip out their wood butchery, replace the insulation and vapor barrier they threw away and reframe the whole thing with proper, presentable materials. It's by far best to hire your own trusted carpenter in such a case or do it yourself if you can.
- The new gh would double as a conservatory, or could be converted into one, and this justifies some sophistication .
- The foundation would have to extend below frost line, and be insulated with 5cm (2") thick polystyrene foam panels ($120). In the event, I had it built of concrete blocks, rather than formed concrete,because of accessibility problems ($728). As well, I found, later, that the insulation should have been doubled and placed inside the foundation as well as under the heat storage material.
- Since the foundation would have to be so deep, it made sense to place about 7 tons of 4" to 6" broken rock ($51 delivered) and a means of storing as much solar heat as possible. Solar heat is sucked down from just below the roof and blown through the rocks by means of a blower salvaged when my oil burner broke down. The heat then radiates upward through a heavy polyethylene plastic membrane under about 5cm (2") of crushed rock which forms the floor. This system requires some management effort, however, and a quiet, less powerful fan would be much preferred. Concrete (8" X 16") 'Cap Blocks' form excellent pathways.
- The roof was given a good pitch so that the smooth surface of the Acrylite can shed any snow load easily. This proved to be very important during all subsequent Winters.
- A 3.6m (12-ft) long roof-line ventilator, two doors, and a window for straight-through ventilation, were incorporated for the Summer. A 30cm (12") barn ventilator and control ($225) was added for forced circulation in Winter and whenever the solar heat blower cannot handle the load in Fall and Spring. However, this fan was a bit noisy, and never really proved to be worth keeping.
- The new greenhouse was connected to the old one, but isolated from it, when needed, by a double polyethylene plastic wall and an access door. This allowed me to set up two different climates whenever I wished to do so.
- The irrigation system was based on a salvaged water closet tank with its ballcock filling control and plastic hoses for gravity fed irrigation. Such a system allows good conditioning of the water and the addition of acidifiers and fertilizers at will. By excluding light from the tank, growth of algae can be prevented. Refilling consists merely of turning on the water tap. Opaque hose from the tank is recommended highly instead of transparent hose because it will inhibit the growth of algae which soon plugs the latter.
- The electric system was based on a 8-circuit panel which was salvaged when I had my house upgraded electrically some years before. There is provision for plenty of individually controlled lights and plug-in sockets, and I used a thermostatically controlled, heavy duty, 220 volt contractor's fan heater to provide heat on cold nights. Since I need only ensure that my plants don't freeze, from October to March, I use a maximum/minimum thermometer to watch how the temperature changes each night, and I adjust the heater to control the temperature at about 7C (about 45F) minimum. Most cacti and other succulents need this cold dormancy to thrive and, especially, to trigger the blooming sequence.
- The benches are 75cm (30") wide and 75cm high. The tops are of open structure with slats about 4cm (1.5") wide. spaced about 2cm (3/4") apart, to allow for good vertical air circulation because of the under-floor heating.
- All the woodwork is stained with a good grade of linseed oil wood stain, and all the wooden benches are designed to be easily taken apart and taken outside to be treated with wood preservative (never use Pentachlorophenol!), or even with varsol floor cleaner, as an insecticide and general clean-up, annually. This would be followed by a good airing for a day or two. I have found this to be an excellent way to keep things neat and bugs under control. It also greatly reduces the need to use other, more dangerous insecticides, which I use only when I must, and with considerable care.
Materials and methods
Because of several peculiarities of the site of the new greenhouse, certain features and some of the materials and methods I used are rather specialized or sophisticated, and probably not very suitable for most applications. I have to admit, also, that I've used this greenhouse building project as another hobby activity and a test of several, perhaps outlandish, ideas. However, here are the major details.
 Because of the slope of the site, I needed a porch and stairs, the materials for which cost about $70.
The three-sided foundation, about 11m(35 ft) long and 1.2m(4 ft) deep, was built by contract and I supplied about 50 of the concrete blocks. I added 2" Styrofoam sheets for insulation. I had no choice but to use concrete block construction because of the location of the structure where a truck wouldn't have been able to go, and the cost of concrete forms which would not have had any later use. Were I to do this again, I would probably double or even triple the insulation and place it inside the foundation. This is because I am using the under-floor space to store solar heat in about 7 tons of broken rock distributed in three trenches with the soil between trenches acting also as heat storage material. I did it this way to save labour because the excavated soil had to be moved out by wheelbarrow, and the rock moved in the same way, all the way across the lot. Perforated drain pipe on the bottom of each trench conducts the hot air through the rock. A salvaged oil burner blower and salvaged 6" sheet metal vent pipes bring the hot air down from just under the roof.
Two standard door jambs were needed to accommodate properly the two excellent cedar combination doors which I used because of their insulation value and good appearance. I'm still glad I did it this way, and I saved about $60 or $70 by using good salvaged hinges and lock sets. Two outer doors I made out of 1 X 4 spruce strapping for temporary use turned out to be easy to dress up and use as very good appearing storm and screen doors. They cost less than $10 each. To frustrate the cat, which likes to climb the screen, and the dog which scratches at it, I put on an outer cover of 1" chicken wire. In Winter time, I cover these screen doors with 4-mil polyethylene on both sides (below right)
) The main frames for the greenhouse were made of 3 X 5 lumber milled for me by Barrett Lumber Co. ( Diagram 2) With the mere $5 setup charge, 300 lin.ft., delivered, cost $198. I chose this size because, for an 11 ft span, with frames on 4-ft centres, exposed on our hill to the prevailing wind which whistles through between my house and the neighbour's, and allowing for probable heavy snow loads, the 3 X 3 standard lumber I normally would have used was not quite sturdy enough. It had to be actually 2.5" thick (nominal 3") because the Acrylite SDP panels need 3/4" of edge support and a bit extra for an expansion allowance, as well as the 3/4"space between panels to accommodate the moulding which holds the panels down Strictly speaking, I needed only a 2.25"thickness for the lumber, but settled for the standard "nominal 3-inch" dimension.
The main frames for the greenhouse were made of 3 X 5 lumber milled for me by Barrett Lumber Co. ( Diagram 2) With the mere $5 setup charge, 300 lin.ft., delivered, cost $198. I chose this size because, for an 11 ft span, with frames on 4-ft centres, exposed on our hill to the prevailing wind which whistles through between my house and the neighbour's, and allowing for probable heavy snow loads, the 3 X 3 standard lumber I normally would have used was not quite sturdy enough. It had to be actually 2.5" thick (nominal 3") because the Acrylite SDP panels need 3/4" of edge support and a bit extra for an expansion allowance, as well as the 3/4"space between panels to accommodate the moulding which holds the panels down Strictly speaking, I needed only a 2.25"thickness for the lumber, but settled for the standard "nominal 3-inch" dimension.)
I deliberately chose not to buy any of the 3 or 4 aluminum or plastic glazing systems designed for the acrylite panels ( Diagram 1) simply because they cost far too much for my hobby greenhouse. For a larger, or a commercial structure, the story might be different. Instead, I made Cap Mouldings (Fig.6) from 2" X 3" spruce lumber, and I made lovely fan arbours with the scrap. Nearly 300 2.5", No 12 round head, Robertson screws. to secure the moulding, were driven with my 3/8" variable speed electric drill fitted with the shank of an old Robertson screwdriver. I pre-drilled pilot holes at 1-ft intervals in the moulding. Galvanized nails (3") would have been better than screws, in the long run; in my case because the slightly flexible greenhouse structure led to eventual cracking of the Acrylite roof panels and the screws, severely rusted, made repairs much more difficult and costly.
Diagram 2 shows the structure of the main frames and the method I used to secure them. The nailing plate gussets and angle plates were made from 1/8" thick duralumin scrap, the remains of aircraft I actually worked on, during my service career, which I bought at the local scrap yard and cut up with my wood-cutting bandsaw. No problem at all. The frames were assembled on a simple jig, and were erected with considerable care to line them up perfectly, and to set them exactly on 4-ft centres. Any inaccuracy here would have been very troublesome later.
ACRYLITE SDP Glazing Panels are 47.25" wide and can be supplied in lengths from 8 ft to 16 ft, or special lengths to order. It can be cut nicely with a 10- or 12-teeth-per-inch handsaw, which I used, as well as by electric circular saw by using a certain type of blade reversed. I chose to order 5 sheets, each 16 feet long, to minimize waste, at a cost of $1438, or roughly $4.50 a square foot, including 500 ft of the Tremco 440 tape necessary for bedding the sheets on the rafters. ACRYLITE SDP and its CYROLON SDP counterpart are manufactured in Canada by Chemacryl Plastics Ltd., Rexdale, Ont., M9W 5X9. In the U.S.A., it is produced by Cyro Industries, Woodcliff Lake, New Jersey., U.S.A. 07675.
The ventilating fan, a 12", 1/4HP, louvred wall fan ($185) with a control unit ($44) were discarded within a couple of years when I saw very early that the 12-ft roof ventilator and the other vents were perfectly adequate. Where a fan is indispensable, however, I would advise selecting a larger unit running at lower speed
1985 costs
The following breakdown of my 1985 costs for the new greenhouse is divided into several sections to show the optional features separately from the essential ones.
Item | .1985 $ | |
| Patio doors and labour, and porch materials | .......... | 1,250 |
| Foundation, solar heat storage materials, labour | .......... | 900 |
| Main structure, glazing, doors, etc | .......... | 2,000 |
| Accessories & misc. materials | .......... | 650 |
| Future materials requirements, perhaps | .......... | 200 |
| Total | .......... | $5,000 |
Further reflections
Now that my new greenhouse has been in operation for well over a year (1987) I can add a few warnings and recommendations for anyone who is thinking of building one. [These are still applicable in 2002].
- VENTILATORS Large area roof ventilators are far superior to motorized fan types, especially if used in conjunction with open (but screened) doors and windows. However, it is very important to be meticulous about making the ventilator leakproof. The coaming must rise at least 7cm (2.5") above the roof, the flashing must be well fitted, and caulking, of the right kind, must be generous enough to compensate well for thermal expansion. I was not quite careful enough with mine, and it leaks!
My motorized wall fan has never been used profitably.
- SOLAR HEAT SYSTEM A couple of interesting points are worth mentioning here. When the sun shines it is blocked, in December & January, until early afternoon by my neighbour . Even so, the 3 hours or so of useable, if low, solar heating I get, is well worth saving. I turn on the blower when the temperature rises above 10C(50F), and the effect is noticeable. This pumps whatever heat is available to storage, but also keeps the greenhouse temperature down where I want it, about 10C or less. The intake pipe is near the roof, and in the higher temperature of any direct sunlight.
As the days lengthen in late Jan. to early Mar., outside temperatures get even colder, but the sun is higher and I get more solar effect and more heat in the Gh., so the changes are still well buffered. Even my minimally effective system, then, is well worthwhile, especially since it is based on a salvaged furnace blower. This is quiet enough and powerful when modified by removing everything except the fan, its housing and motor, fairing the gaps and fitting an adapter and intake pipe. The nozzle fits snugly inside a 4" composition drain pipe which acts as mounting unit and air pipe to the underfloor storage. The system price is certainly right, but it requires some management effort. A slower, larger blower would be better.
- INSULATION In view of what I said above, it's obvious that foundation insulation should be very good. It will pay for itself fairly quickly, too. I'm now convinced that at least 10cm (4") of styrofoam insulation should be placed inside the foundation, and even under the storage material.
- LIGHT & SHADE With very generous ventilation arrangements, and the kinds of plants I grow (cacti and other succulents), I don't have to worry much about shade. Full sun in Winter, in this climate, dryness and slight air movement such as is provided by my solar heat system and fan, is just about right for the plants, and they're doing marvellously well. In Summer, the same applies, with a few exceptions, if I use wide open, screened vents and let the breezes blow through the greenhouse.
But for other kinds of plants, you'll need some kind of shade system. Shade cloth sliding on wires is probably the best system to consider, and the amount of shade you require will be determined by your plants. You should know, however, that the acrylic material of your greenhouse can be damaged by many of the materials which are used as shading washes and paints. So check with the supplier if you intend to use one of these.
Very obviously, this greenhouse was somewhat of a 'Cadillac' structure, and many of its features will not be needed or wanted in most applications. Nevertheless, I enjoyed the project immensely, I learned a great deal and I certainly enjoyed very much the things I could do in this project for a long time without having to worry much about keeping it all in good condition. Now, if anyone derives any pleasure or profit from this story about it, I'll be delighted.
| Paul J. Brunelle September 12, 2002 |
Post Script: History of the article
Several versions of this article about the evolution of my greenhouse have been published, since 1986, in the journals listed below. The version presented here has been modified to support the aims of the Dalhousie Cactus Collection web site. No attempt has been made to alter the original prices mentioned in the text in order to retain the overall comparisons they indicate. A 'rule of thumb' which might be useful to indicate present costs in Nova Scotia, seems to be to multiply those figures by about 2.5.
- The Newsletter of the Cactus & Succulents Information Exchange, Vol.18, No.6,
1986.
- Rural Delivery, Jan/Feb, 1988. This is a popular Farm and Country Journal edited by
Mr. Dirk Van Loon, PO Box 1509. Liverpool NS, Canada, BOT 1K0
Web site: www.countrymagazines.com
- The British Cactus and Succulents Society Journal, Vol.7, No.1, 1989.
Web site: www.bcss.org.uk
e-mail: bcss@cactus-mall.com
Hon. Secretary - E.A.Harris, 49 Chestnut Glen, Hornchurch, Essex RM12 4HL England.
email: eaharris@lineone.net
- TLC...for plants, Vol.2, No.2, 1989. A home gardener's magazine not now surviving.